|
|
Shift Console Pod Cap
Please keep in mind that these are merely suggestions for installing shift console pod caps and ash tray doors. There are other acceptable ways to install these parts. The Fiero Store is only responsible for the parts that it ships. The Fiero Store is not responsible for any expenses incurred as a result of installing of any part. Be sure to read these instructions in their entirety before starting the project. Please seek the help of a professional automotive technician if you feel that this may not be the job for you.Installing Shift Console Pod CapsAll caps come in black plastic and may need to be painted to match your interior. Check out The Fiero Store's selection of color matched console paint on the "Interior - Interior Paint" page.
- Remove ash trays and shift knob.
- Remove the two 7mm screws underneath each ash tray.
- Lift off the shift console pod.
- Remove the face plate from the pod. The factory face plate was glued to the pod, so you may need to pry it off gently. A small heat gun may make this process easier. Be gentle so you do not damage the plate or the pod.
- The console pod cap is designed to fit over your current console pod. Therefore, you will need to first glue your old pod back to its original form. To do this, apply the strongest type of glue possible (anything that will adhere securely to foam and plastic) underneath the bowed portions of your console pod. Be sure to clamp all of the bowed edges to the plastic frame once the glue is applied and allow plenty of time for the glue to cure, as instructed by the glue manufacturer.
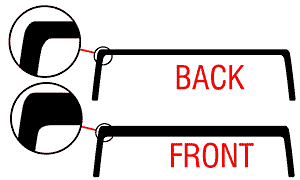
- Once the pod is restored as close as possible to its original form, test fit the console pod cap on the glued pod. To determine the front and rear of the cap, note the difference in the width at the top and bottom of the cap (see the diagram below). Be sure to snap the cap over the pod as tightly as possible so that the front of the cap is at the front of the pod. You may need to trim a portion of the rubber on the edge of the pod for a better fit.
- Test fit the face plate on the pod/cap. The face plate should snap down into the cap. You may need to slightly trim the cap, pod or face plate for a perfect fit.
- Once you are confident that the cap will fit securely over the pod and the face plate will fit securely in the cap/pod, glue the cap over the pod. We recommend letting the glue cure for at least 24 hours or as instructed by the glue manufacturer.
- Reinstall the completed shift console pod.

|
|
|
|