|
|
Rear Sway Bar Installation Instructions
The following instructions are merely suggested options for installation. The Fiero Store is only responsible for the parts that it ships and is not responsible for faulty installations. Labor claims will not be acknowledged. If you are not familiar with the processes listed below, please seek the help of a professional automotive technician.
CAUTION: DO NOT WORK UNDER CARS ONLY SUPPORTED BY A JACK.
USE SECURE JACK STANDS OR A LIFT.
NOTE: This bar will mount via frame cross member with moment arms towards rear of car and end links mounting in OE hole in lower swing arm. Main brackets will mount after holes drilled in frame. All 4 holes will need to be drilled.
1. Jack up rear of car and remove wheels. Place jack stands securely under car in such a manner that the rear springs are loaded as if the car were on the ground.2. Locate the forward-most vertical hole in the mid-section of each A-Arm and enlarge to 5/8" diameter. Mount the end link assembly and spherical bearing pointing downward as illustrated in Figure 1. Tighten the bolt until the grommets start to deform but do not crush them. Repeat this for the other side.3. Take a 3/8" x 2" bolt and place one 3/8" S.A.E. washer on the end of the bolt. Insert the bolt through the spherical bearing from outside of the car pointing in. Place one 3/8" S.A.E. washer the bolt and slide the completed assembly through the hole in the swedged end of the moment arm. Install the end nut and tighten. Repeat this for the other side. See Figure 2.4. Lubricate the inside of your new polyurethane bushings with a high grade bearing grease. Place the new bushings in the appropriate positions on the sway bar. Place a bushing clamp over the bushing and center on the frame member for drilling. Repeat this for the other side. See Figure 3.5. With a center punch, mark the center of the elongated holes (with spherical bearing as close to vertical as possible). Drill holes through the frame using and 7/16" drill bit.6. Place one large washer on each remaining 3/8" x 1" bolt. With the bolt pointing down, place through the hole from the opening on the outside of the frame. Place the clamp back over the bushings. Install the washers and tighten. Repeat this for the other side. 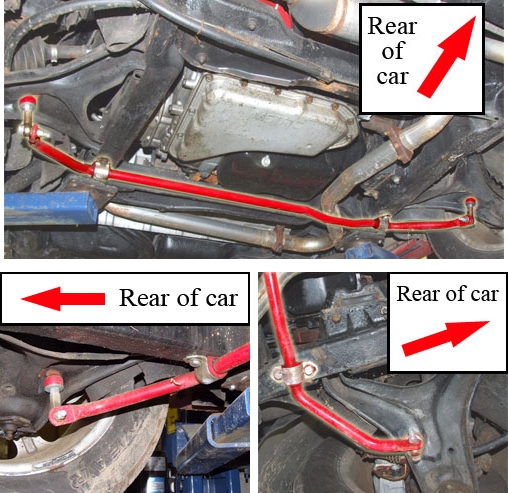
|
|
|
|