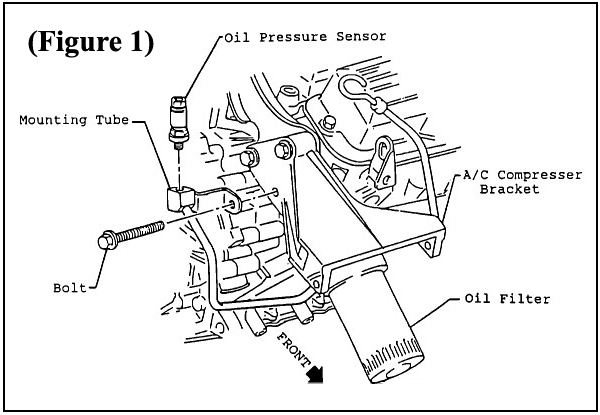
V6 Oil Pressure Sending UnitThe V6 oil pressure sending unit screws onto a tube that locates the unit in front of the left (front) valve cover, above the timing cover (Figure 1).
 To remove the oil pressure sending unit: To remove the oil pressure sending unit:
1. Locate the small nut portion of the unit directly above the threads. Use another wrench to hold the oil pressure sending unit tube while loosening the sending unit.
2. Apply a small amount of thread sealant or thread tape to the new sending unit and screw back in place.
The location of this unit makes it susceptible to water ingestion and possible premature failure. If you are experiencing multiple sending unit failures, then it should be relocated just above the oil filter. The following instructions detail this procedure:
1. Raise decklid and remove the right hand louver assembly. Disconnect negative battery cable.
2. Remove the oil pressure sensor
3. Remove the main wire harness retaining clip.
4. Remove the oil pressure sensor mounting tube retaining bolt (Figure 1), then move the tube out of the way. Reinstall the bolt, and torque to 50 N-m (37 lb. ft.).
5. Remove the screw from the EGR solenoid and move it out of the way.
6. Remove the oil pressure sensor connector wire from the conduit, down to the first tape on the conduit (about 9 inches). Tape the wire to the conduit so that the wires are facing down. Route the oil pressure sensor wires near the main harness, just above the A/C compressor. Reinstall the rest of the wires back into the conduit and retape. Reinstall the main harness retaining clip, insuring that the clip does not touch the transmission cooler lines or pinch any wires.
7. Reinstall the EGR solenoid on its mounting bracket.
8. Hoist vehicle.
9. Remove oil filter.
10. Using a back-up wrench on the brass fitting (Figure 2), remove oil pressure sensor mounting tube and discard. Remove the brass fitting and discard it also.
11. Obtain the following parts from a hardware or plumbing supply store:
a) 1/8" nipple (1" long)
b) 1/4" to 1/8" reducer (female inside male)
c) 1/4" to 45 degree angle (female both ends)
12. Loosely assemble the nipple into the female end of the
reducer, and the angle onto the male end of the reducer, using teflon pipe sealer, on all joints.
13. Install the fitting assembly into the block, also using pipe sealer. Tighten the fitting until it is firmly seated, and the angle is correct to locate the oil pressure sensor just below, and not touching, the A/C compressor.
14. Install the oil pressure sensor, again using pipe sealer. Install the connector on the oil pressure sensor.
15. Replace the oil filter. Check oil level, and add additional oil if necessary.
16. Lower vehicle, reconnect negative battery cable, start engine, and run for one minute. Check for proper operation of oil pressure gauge. Shut engine off.
17. Raise vehicle, and check for oil leaks.
18. Lower vehicle.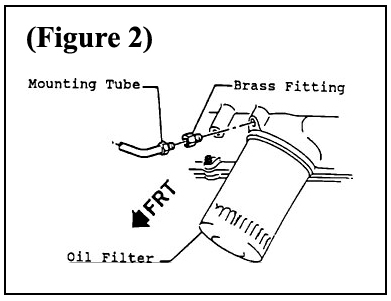
|
|